How to Use Own Photo as Blog Background Pakistani Blogs

How to Use Own Photo as Blog Background Pakistani Blogs
Blogger in Draft's Template Designer now has a new feature which allows users to upload their own photos as background easily.

To do so, go to Dashboard > Design > Template Designer > Background.

blogger upload image

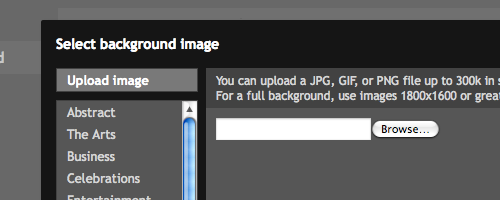
Click on the "Background image" and you'll be able to see the "Upload image" feature. Click it and you'll be able to select the preferred picture as your blog's background.

According to Blogger in Draft blog, for images that fill the entire background, a resolution of 1800px wide and 1600px high is recommended and image size less than 200KB to minimize loading time of the blog. It support JPEG, GIF, and PNG format images.

At the end, additional background settings are available by using the Alignment, Repeat and Scroll options.

Thanks for reading the post please share

How to Remove "showing newest posts with labels" Blogging in Pakistan

How to Remove "showing newest posts with labels" Blogging in Pakistan
  1. ITS TOO SIMPLE NOW . .
Log in to your Blogger account, Back-up your template, then go to:

Dashboard > Layout > Edit HTML > check Expand Widget Templates box

Find the following part of code:

<b:includable id='status-message'>
<b:if cond='data:navMessage'>
<div class='status-msg-wrap'>
<div class='status-msg-body'>
<data:navMessage/>
</div>
<div class='status-msg-border'>
<div class='status-msg-bg'>
<div class='status-msg-hidden'><data:navMessage/></div>
</div>
</div>
</div>
<div style='clear: both;'/>
</b:if>
</b:includable>

Then REPLACE it with:

<b:includable id='status-message'>
<b:if cond='data:navMessage'>
<div>
</div>
<div style='clear: both;'/>
</b:if>
</b:includable>

Save.

Now open your blog and view any label.


Regards MuftPakistan

Pakistani bloggers blogging

hello dear visitors we have got some thing new
FOR PAKISTANI BLOGGERS WHO WANT TO EARN MONEY THROUGH ADSENCE


BLOG KI TRAFFIC ZIADA KERNAY AUR EARNING TIPS AB ROMAN URDU MEIN B AVALIABLE HON GI 

How to Invite Viewers with Event Gadget blogger blog

The Followers Gadget has been integrated with Google Friend Connect. You can now add all the gadgets available in Google Friend Connect to your blog.


One of these is the Event Gadget. It shows information about any event you want to inform blog readers about. The description, time, location, map is included. Viewers can join the event and see who else has joined the event. See picture at left. Other gadgets like Members, Comment Wall and Social Bar gadget can also be added.


To add this and other such gadgets to blog follow these steps........


ADDING THE EVENT GADGET :


1. Login at Blogger.com and check the Remember Me box while doing so.


2. Go to Google Friend Connect. You will see all your blogs listed in left sidebar under 'Sites'.


3. Click your Blog Title and it will expand to show submenu below it.


4. Click on 'Social gadgets' link.


5. Click on 'Event Gadget' link.


6. Under Options select and choose the various options like Page, and fill in your Event's Title and Description. Choose the start and end dates and the Timezone. Fill in the Location, address and Media URL which is link of the picture or logo of your event.


7. Choose the gadget's size to fit your sidebar or you may have to increase blog width.


8. Lastly click Generate Code button.


9. Copy the code given and paste in a HTML gadget in your blog.


10. Similarly you can add any of the other gadgets available like Members gadget and Comment Wall gadget. You can see these gadgets in action at top of third column in this blog. The social Bar gadget is at the top of the blog.


Feel free to leave a comment for any concerns!

MuftPakistan.com Sign up for FREEUpdates.